
Attacking the undersea Pearl map in Valorant can be a daunting prospect, but with the right Sova arrows your team can gain control of key areas and claim rounds. Remembering a hundred pixel-perfect lineups just isn’t possible for many of us though, so our easy Pearl Recon Bolt spots guide for Valorant focuses on simple and memorable shots that will still help your side out tremendously.
Valorant: Easy Pearl Recon Bolt spots you won’t forget

© Riot
As with our previous Recon Bolt guides, we’ve focused on the attacking side with our lineups, as it’s here that Sova is most vital to his team’s efforts. For each position we’ve explained where to stand, where to aim, and where the shot should land so that you can easily copy our steps. Either scroll through all the recon arrow lineups below, or click the one you’re after from this list to jump straight there.
- A Site Recon Bolt
- B Site Recon Bolt #1
- B Site Recon Bolt #2
- Mid / B-Link Recon Bolt
- Mid Art Room / A-Link Recon Bolt
Pearl A Site Recon Bolt spot
- Charge: 3 Bars (full)
- Bounce: 1
This Recon Bolt spot, fired from A Main, lands above the site itself, revealing anyone hiding close to the entrance, at the back edges, and even in the A-Link pathway.

© Riot
You’ll set up this Recon Bolt spot by heading to the corner shown above on A Main. You’ll need your team to secure this initial corner up to the box, so make sure you push with others at the start of the round to fend off aggressive enemies. Stand in the corner to the right of the Kingdom text, then look to your right, towards the picture of a crane on the tarp below some scaffolding.

© Riot
At the point where the horizontal and vertical parts of the crane silhouette meet, put your crosshair in the bottom left gap within the crane. You don’t need to be pixel perfect, just make sure your crosshair is inside this area. Further to the left is better, otherwise you might bounce off the inside of a hidden bump on the wall. Charge to full power with one bounce.

© Riot
This Pearl Recon Bolt spot lands on the corner of the building above the A Site and A Link section. It scans pretty much the entire site except for those hiding directly behind the plant box or further back towards spawn. Make sure you know where it doesn’t clear so you can watch these spots as you attack. Credit to Snapiex for discovering this easy-to-remember angle.
Pearl B Site Recon Bolt spot 1
- Charge: 1 Bar
- Bounce: None
This easy Pearl Recon Bolt spot is fired from Mid Shops (the B-side entrance to mid). It lands above the box in the back wall of the site itself, making it very powerful for any teammates preparing to push the site at the top corner of B Ramp. The arrow travels quickly, so you’ll need to coordinate with teammates close to the site to take advantage of it.

© Riot
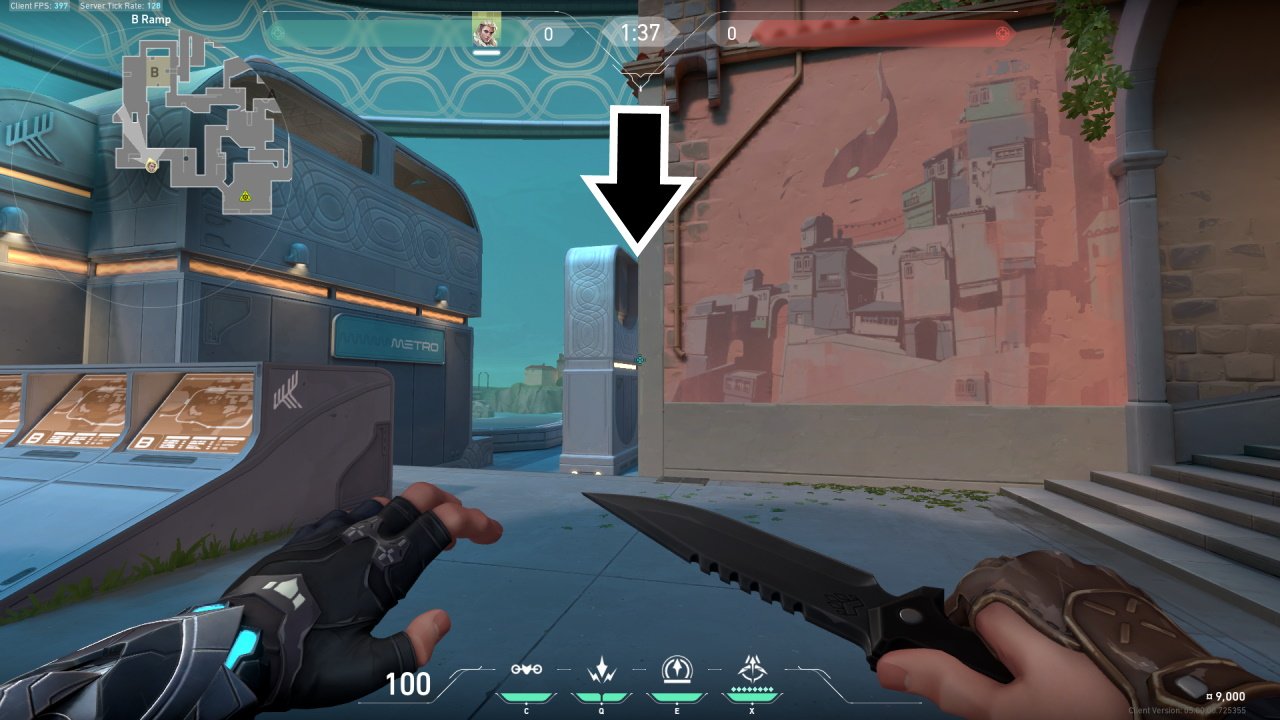
To start, stand in this corner next to the spawn archway in Mid Shops. Face toward the B-Site and look at the hanging lights in the street ahead.

© Riot
Looking towards the site, you want to aim at the first of the bluey gray lights that isn’t overlapping the opposite wall house. It should be the fourth light along from the left. Even if you mix up which light you aim at, the arrow should still land in a vaguely useful position on the site. Charge one bar with no bounces.

© Riot
The Recon Bolt should land above this box on the back wall of the site. That will clear anyone hiding behind the screen on the left, close to the corner. It'll even check players in Tower if they don’t back out of sight. Be warned that this arrow doesn’t cover the back corridor, so you will need to clear that.
Pearl B Site Recon Bolt spot 2
- Charge: 3 Bars (full)
- Bounce: 1
If you’ve successfully taken B-Ramp and want an arrow to clear the same positions, there’s an easy lineup available from there that’ll put your arrow in roughly the same place as the previous one. This one allows you to attack after firing it but puts you in a more vulnerable position initially. Make sure you have allies covering you as you line it up.
© Riot
Start this arrow by standing along the back wall of B-Ramp and looking towards the site. Move along the wall until the edge of the central building block on the path heading down to the site lines up with the corner in front of you.

© Riot
Aim at the curved shape where the upper half of that central block swaps to glass (above the yellow line). Put your crosshair on the right side of the curve, roughly halfway along. The positioning doesn’t need to be precise – you just need to make sure you’re on the right side but won’t hit the closer corner with your shot. Charge to full power and apply one bounce.

© Riot
This arrow bounces off the structure and lands in pretty much the same place at the last one, revealing anyone behind the screen on the left and the bulk of the site itself. Again, you will need to watch the back corridor, B-Link, and Tower as you push in.
Pearl Mid (B-Link) Recon Bolt spot
- Charge: 0 Bars
- Bounce: None
This Pearl Recon Bolt lineup aims to help your team attack mid and push through the double doors to B-Link. Fired from Mid Shops, you can even capitalize on it yourself, though we’d recommend having your duelist make the actual attack with a flash if you tag anyone.

© Riot
To start, head to mid shops (the left route to mid) and stand on the right side of this archway. This should be where the spawn wall is before the round starts. You can tuck in tightly to that corner if so. If it's later in the round, just get the place roughly correct, there's a good deal of leeway on where you can stand.

© Riot
Look above the wall with the Onze store ahead and aim at the top-right corner of the roof with the metal rods poking out. Fire without any charge or bounces. Be warned that you will be a little open to mid as you unleash this arrow, but if you use it quickly in the round then you won’t be in danger.

© Riot
This Pearl Sova lineup lands on the back wall in B-Link, revealing anyone hiding behind the double doors or further down the corridor. You can adjust the angle to try different landing positions here if you feel comfortable with it. Credit to Snapiex for discovering this easy-to-remember angle.
Pearl Mid (A Art Room) Recon Bolt spot
- Charge: 3 Bars (full)
- Bounce: None
The last of our Pearl Recon Bolt spots will help your team take control of Art Room on the A-Link route from mid. This is one of the easiest arrows Sova has in his arsenal, yet it’s also one of the most useful for splitting attacks on A.

© Riot
Start by standing in the middle of this upper walkway at A Restaurant (the route to A Site). You don’t need a particular position, but we’ve marked next to the vines and lamp to make it easy as possible.

© Riot
Look toward the hole in the wall ahead into Art Room and aim at the picture of the bell on the ceiling. Again, you don’t need to be precise, but we found aiming for the lighter part of the central bell to work well. Charge to full power with no bounces and release.

© Riot
This Pearl Recon Bolt spot reveals anyone standing within the Art Room and also further down A-Link. The wall between your position and this one is penetrable by heavy weapons, meaning if you know someone plays there, you can even use Odins or an Operator to secure an early kill on them.
Want more Recon Bolt spots for other maps? Check these guides out:
- Easy Ascent Recon Bolt spots
- Easy Haven Recon Bolt spots
- Easy Icebox Recon Bolt spots
- Easy Fracture Recon Bolt spots
- Easy Breeze Recon Bolt spots
Those are all the easy Pearl Recon Bolt spots in Valorant that we’ve found so far. Discovered any other unforgettable ones? Share them in the comments below.