Call off the attack everyone, I misjudged the pixels on that tree branch. Let's be honest, there's a lot going on in Valorant, and most of us only have so much brain space for tricky lineups on each and every map. As such, our Easy Fracture Recon Bolt spots guide aims to help even the average Sova player help their team with detection arrows each attacking round.
Easy Fracture Recon Bolt spots you won’t forget

© Riot
Note: Because Fracture is such a new map, this guide is a work in progress. We’ll update it with better arrows once we’ve learned more for the new map. Defenders are aggressive on Fracture, so watch out for pushes while you’re lining up shots.
We've focused on the attacking side because that's where most players tend to struggle. We've explained where to stand, where to aim, and where the bolt will land, so you know exactly what it covers. Because Fracture is split in two, we’ve also split our guide to explain arrows to fire from both sides of the map (Spawn and Opposite). With that out of the way, let's get started with our easy Ascent Recon Bolt spots. Click the links below to jump to each bolt spot, or scroll down to see them all.
- A Site Recon Bolt Spawn
- A Site Recon Bolt Opposite
- B Site Recon Bolt Spawn
- B Site Recon Bolt Opposite
Attacking A Site Recon Bolt - Spawn side
- Charge: 3 bars (full power)
- Bounce: 2
From the spawn side, attackers need to push through a tight tunnel to reach the A Site. As such, it’s important you clear this first and foremost. This arrow should be fired right at the start of a round, as quickly as possible before opponents reposition themselves. It clears the corridor but only a sliver of the site itself. Use it get your team closer before they attack.

© Riot
Start by standing at the left side of the tunnel entrance before the round starts. You’ll want to stop around the middle of the first grey bar, but the position doesn’t need to be exact. Turn around and look toward the tunnel to A.

© Riot
You want to aim at the top right corner of the grey rim to the wall on the opposite side of the corridor. You should be able to see the end of that wall segment as it opens up abit. Aim at the triangular gray corner and full charge a two-bounce arrow.
© Riot
This Fracture Recon Bolt land above the box in the corridor, pinging anyone playing aggressively for your team. You can push off this yourself or use it to set allies up closer to the site. Just be wary of flashes at the end of the corridor and anyone pushing through the door on the left. We recommend flying your drone through this door to clear it for your teammates.
Attacking A Site Recon Bolt - Opposite side
- Charge: 1 bar
- Bounce: 1
This Fracture Sova Recon Bolt spot lands on the back wall of the site, clearing anyone in the main site area. The A site is busy with cover, however, so you’ll needo watch out for anyone hiding on the upper or lower plant areas, in the tunnel on the spawn side, or to the far right of the site. You’ll also want your team to push up past the giant radar dish before you fire this Recon Bolt.

© Riot
Start by standing in the corner on this upper rocky shelf. Turn to face toward the site and look for the large Kingdom K in white on the overhanging roof ahead. It should be pretty obvious.

© Riot
Aiming at the kingdom K in white, you should see a vertical line to it’s right. Aim at this, then pull your aim up into the sky above the roof. You should be roughly at the height of the closest parapet of the tower in the distance on your left. It sounds a bit fiddly, but as long as you’re aiming high enough, this shot should work. Aim too low and it’ll get stuck on the first roof instead of bouncing. Charge one bar with one bounce and release.

© Riot
This Sova Recon Bolt for Fracture lands on the wall as shown. As noted before, A site has loads of places to hide behind, making clearing them all impossible. This will get anyone lurking in the main areas of the site, however, making it a good early check. Just be careful of any defenders who have pushed up toward the radar dish.
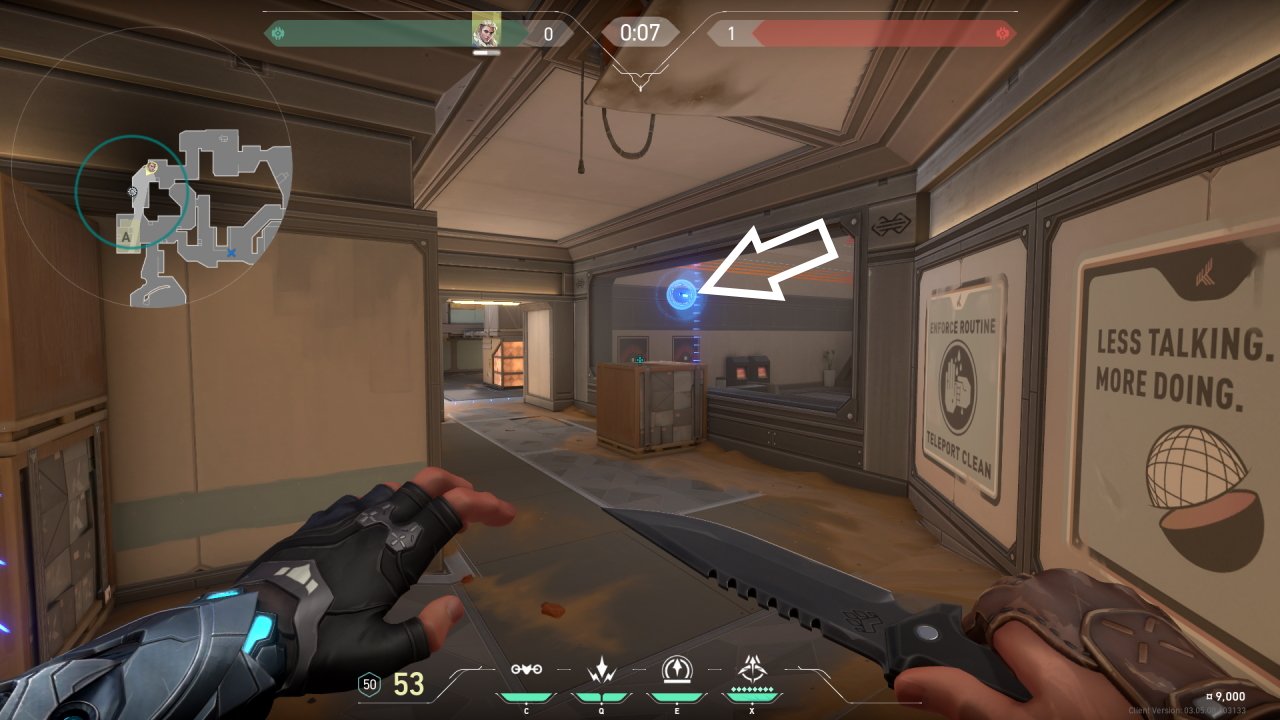
Attacking B Site Recon Bolt - Spawn side
- Charge: 1 bar
- Bounce: None
This Fracture Sova Recon Arrow will clear anyone hiding in the corridor next to the B-site plant spot, along with anyone on the plant area itself, including the cubby to the left. You’ll need to clear the initial entrance corridor, however, so make sure your teammates have some flashes (or confidence) prepared for that.

© Riot
Line up up this Fracture B Site Sova Recon Dart, stand behind this set of boxes on your right as you come around the first corner from spawn. Wedge yourself up against the wall, right in the corner and look upwards toward the site.

© Riot
You should see a fern hanging above and directly in front of you. Aim beloy the third leaf at roughly the height of the building in the distance to the left. It sounds fiddly, but the aiming angle is pretty generous so long as you remember that third leaf. Charge one bar of power with no bounces and release.

© Riot
This arrow lands on the wall of the doorway to the corridor/tunnel on the site. Players like to hold from this area, making this a great dart to flush them out or distract them as your side approaches. You’ll need to watch out for the entire right side of the B site though, as this arrow won’t clear any of it.
Attacking B Site Recon Bolt - Opposite side
- Charge: 3 bars (full power)
- Bounce: 1
Coming from the opposite side, you’ll need to push up to a more aggressive position to fire off several different Sova arrows for Fracture’s B site. This is a tricky site to clear as there are a large number of angles. This arrow should clear the two front corners and the back corridor which leads to the Defender spawn. It doesn’t clear the arcade area (with the zipline to the corridor) you’ll need to pass first.

© Riot
Start by standing behind this small box, against the wall. Look up and towards the site to aim at the large white-panelled building overhanging the area.

© Riot
See that big missing panel with the large pipe running through it? You want to aim halfway down the panel underneath that, below the right edge of the pipe, as shown. Charge a full power, one bounce arrow and release.

© Riot
This Fracture Sova Recon Bolt spot lands on or in front of the box at the opposite side entrance to the site. It should clear anyone in the corridor beside this, as well as anyone holding close to the corners on your side. It won’t clear the corridor, behind the boxes, or your left side as you push in.

© Riot
This arrow is extremely flexible. By aiming at the bottom left corner of the broken panel, you can adjust it to land on top of the large box on the left, or on the wall behind. We recommend mixing up your aiming angle to keep enemies guessing as to where your arrows will land.
Those are the best Easy Fracture Recon Bolt Spots for Valorant's Sova players that we’ve found so far. The map is extremely new, however, so we’ll keep practicing and update this guide with superior or additional arrows as and when we find them. We also have Recon Bolt map guides for Ascent, Haven, Icebox, and Breeze, so study those at your leisure.